
Enhancing Recommendations with Vector Search: Integrating DronaHQ and MyScaleDB
Personalized and accurate recommendations are essential for enhancing user experiences and good UX is the key to winning. By combining the power of MyScaleDB’s vector search with DronaHQ’s low-code platform, we created a smart restaurant finder that offers tailored suggestions based on user preferences.
This guide is for developers, product managers, and tech enthusiasts who want to build sophisticated, data-driven applications without getting bogged down in complex code. Whether exploring new ways to enhance user experiences or looking to understand how to leverage vector search in real-world applications, this blog offers practical insights and step-by-step guidance.
With DronaHQ’s low-code platform, you can create comprehensive applications that integrate advanced data capabilities like vector search with user-friendly app-building tools. By the end of this article, you’ll learn how to:
- Understand the basics of vector search and its applications.
- Prepare and manage data in MyScaleDB for more effective searches.
- Seamlessly integrate MyScaleDB with DronaHQ to build a location-aware restaurant recommendation app.
- Quickly create and deploy a powerful app that leverages advanced search capabilities, all within the DronaHQ platform.
What is Vector Search?
Vector search is an advanced technique that transforms data into vectors, in a multi-dimensional space, where each vector represents the key features of the data. Using cosine similarity, these vectors are then compared based on how close they are to each other in this space. This helps to determine how conceptually or contextually similar two data points are, even if they don’t share the same words. This approach goes beyond traditional keyword searches that match specific keywords. Vector search is handy when you want to find semantically similar items, even if they aren’t identical.’
In a restaurant recommendation system, vector search can analyze and compare various factors such as ambience, user reviews, and dining experiences by converting these aspects into vector representations. This allows the system to identify restaurants that are similar in terms of the overall dining experience, rather than just matching specific criteria like the type of cuisine or price range.
Preparing Data in MyScaleDB
For this blog, we will be using MyScaleDB, an open-source, high-performance SQL vector database. It’s designed to provide advanced vector search capabilities with the familiar SQL. Built on top of ClickHouse, MyScaleDB can efficiently manage both structured and vectorized data in a unified system, making it an ideal choice for large-scale AI applications.
One of the main reasons for choosing MyScaleDB for this project is its Multi-Scale Tree Graph (MSTG) indexing algorithm. This algorithm delivers high-speed vector operations alongside efficient storage of data, outperforming specialized vector databases in terms of both cost and performance. MyScaleDB fully supports full-text search, simple vector search, and hybrid search, but for our use case, we only use simple vector search. Most importantly, MyScaleDB allows new users to save up to 5 million vectors for free, so we don’t have to pay anything for this MVP app.
Create a MyScaleDB Cluster
To start using MyScaleDB in our DronaHQ application, the first thing we need to do is create a cluster on the MyScaleDB cloud for data storage. For that, visit the MyScaleDB console, register, log in, and click the “New Cluster“ button in the top right corner to create your MyScale
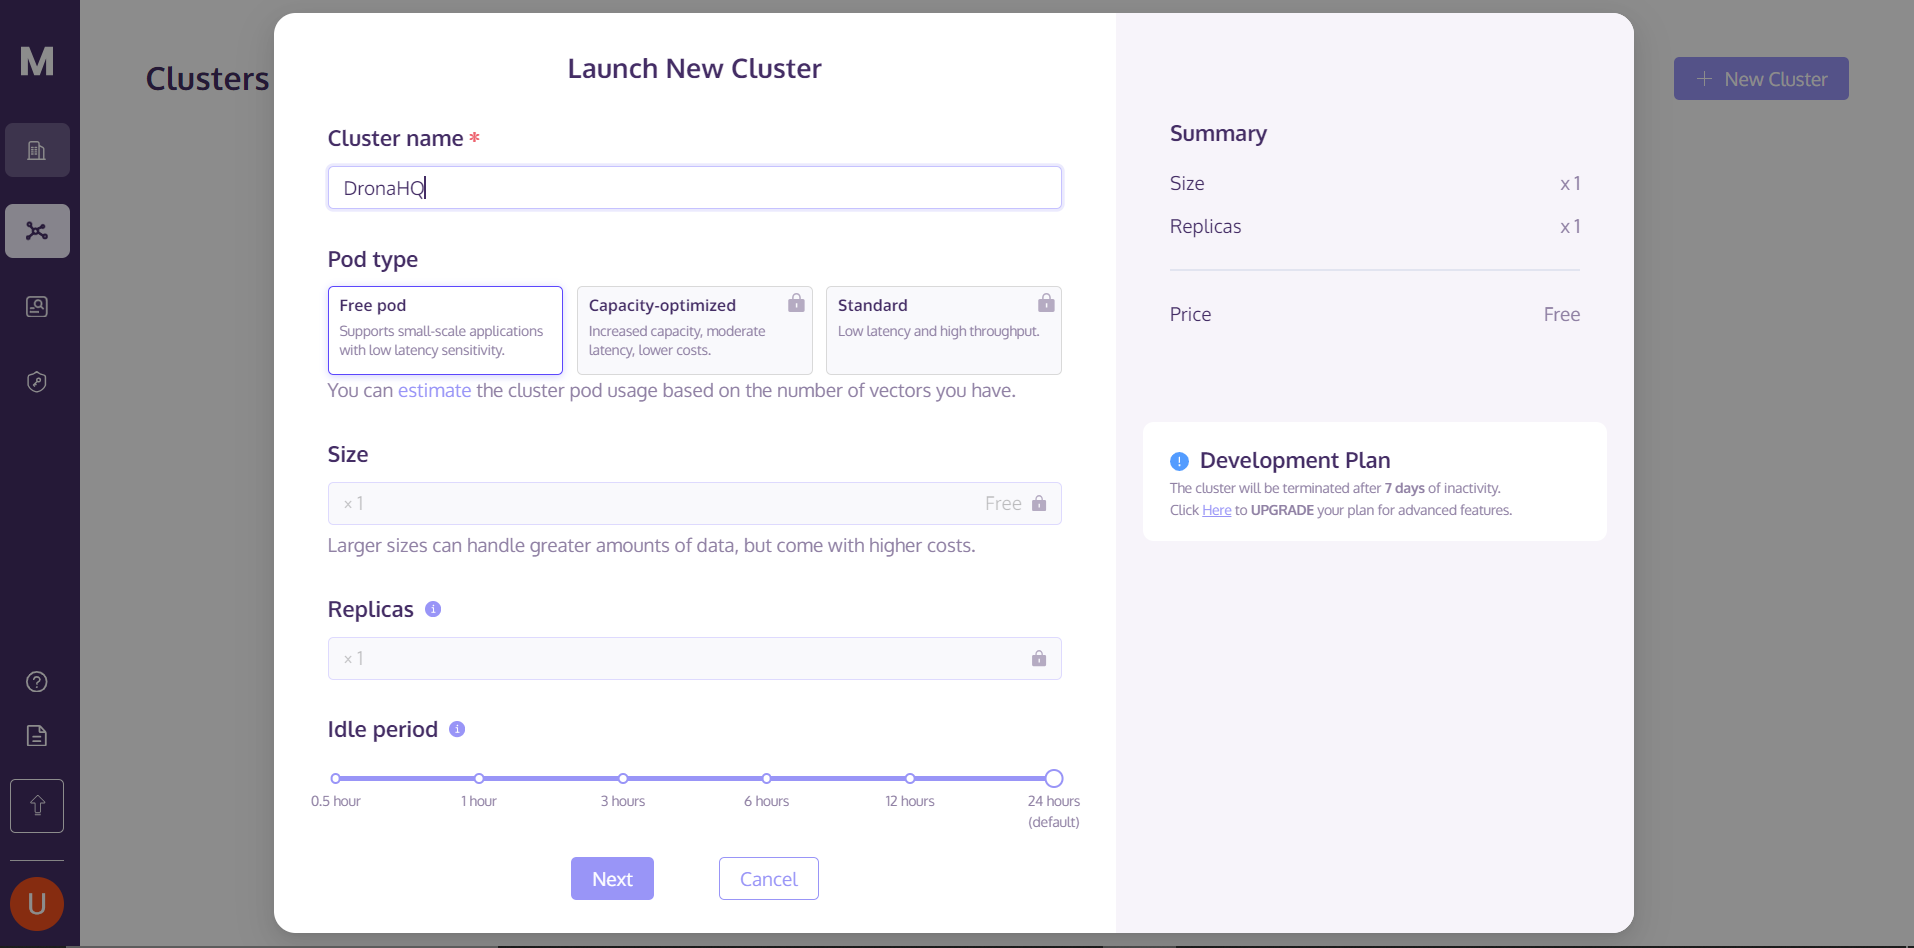
After entering the Cluster name, click the “Next” button and wait for the cluster to finish starting up.
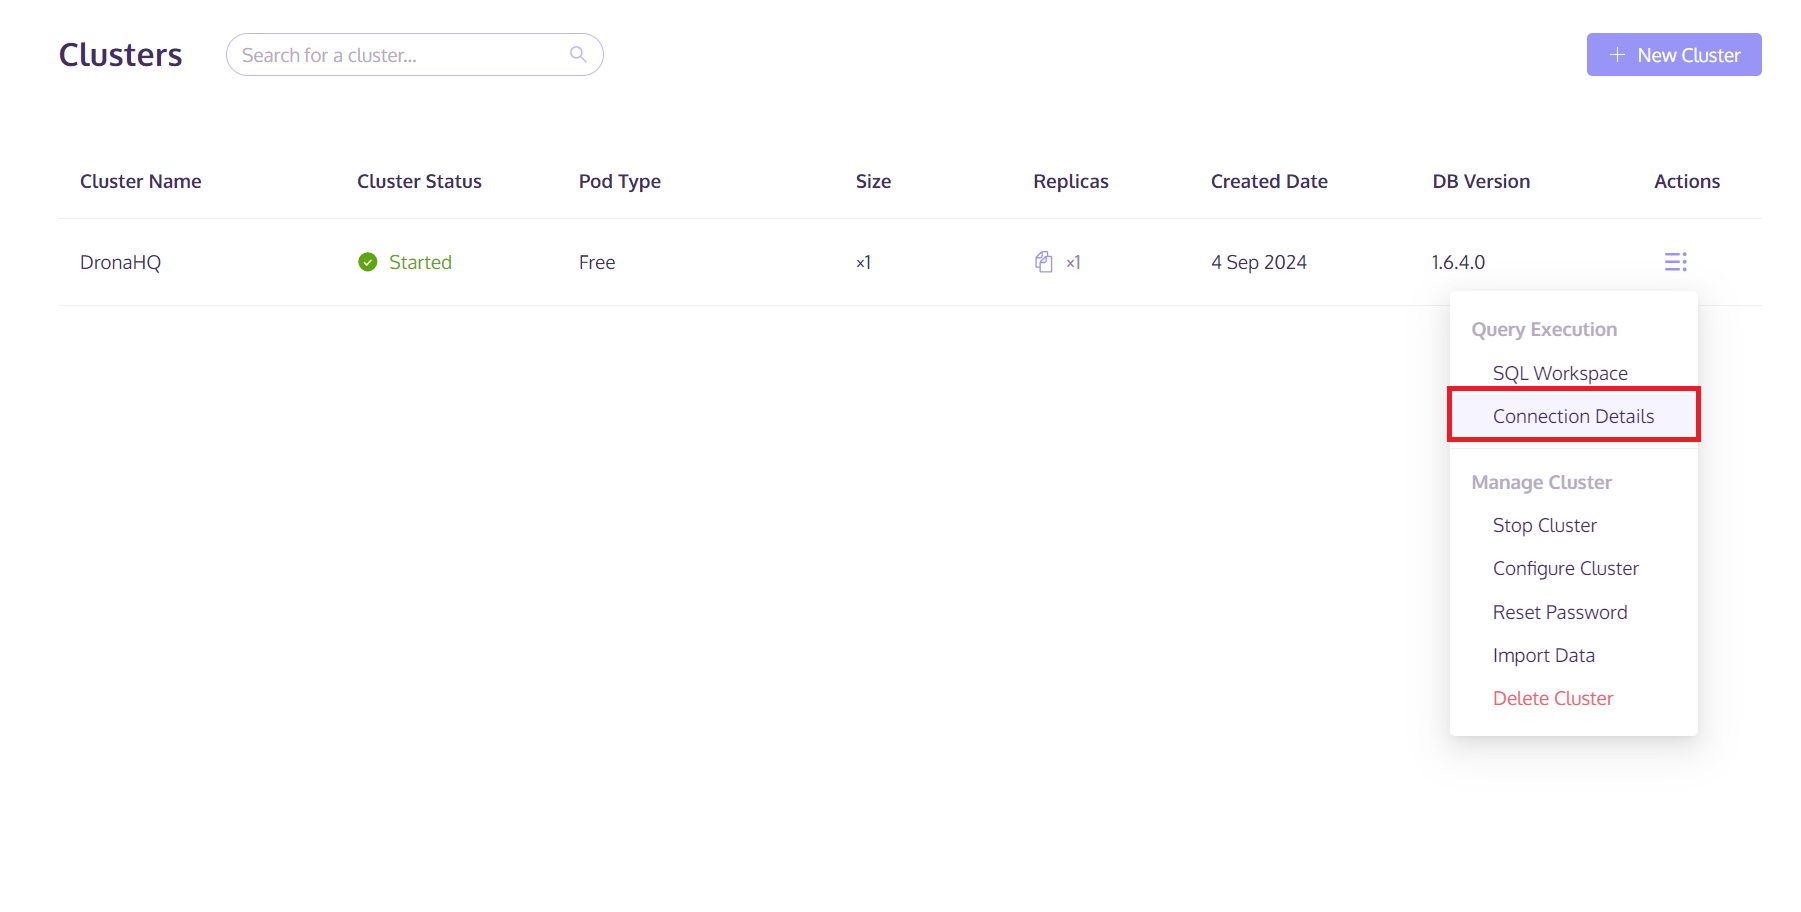
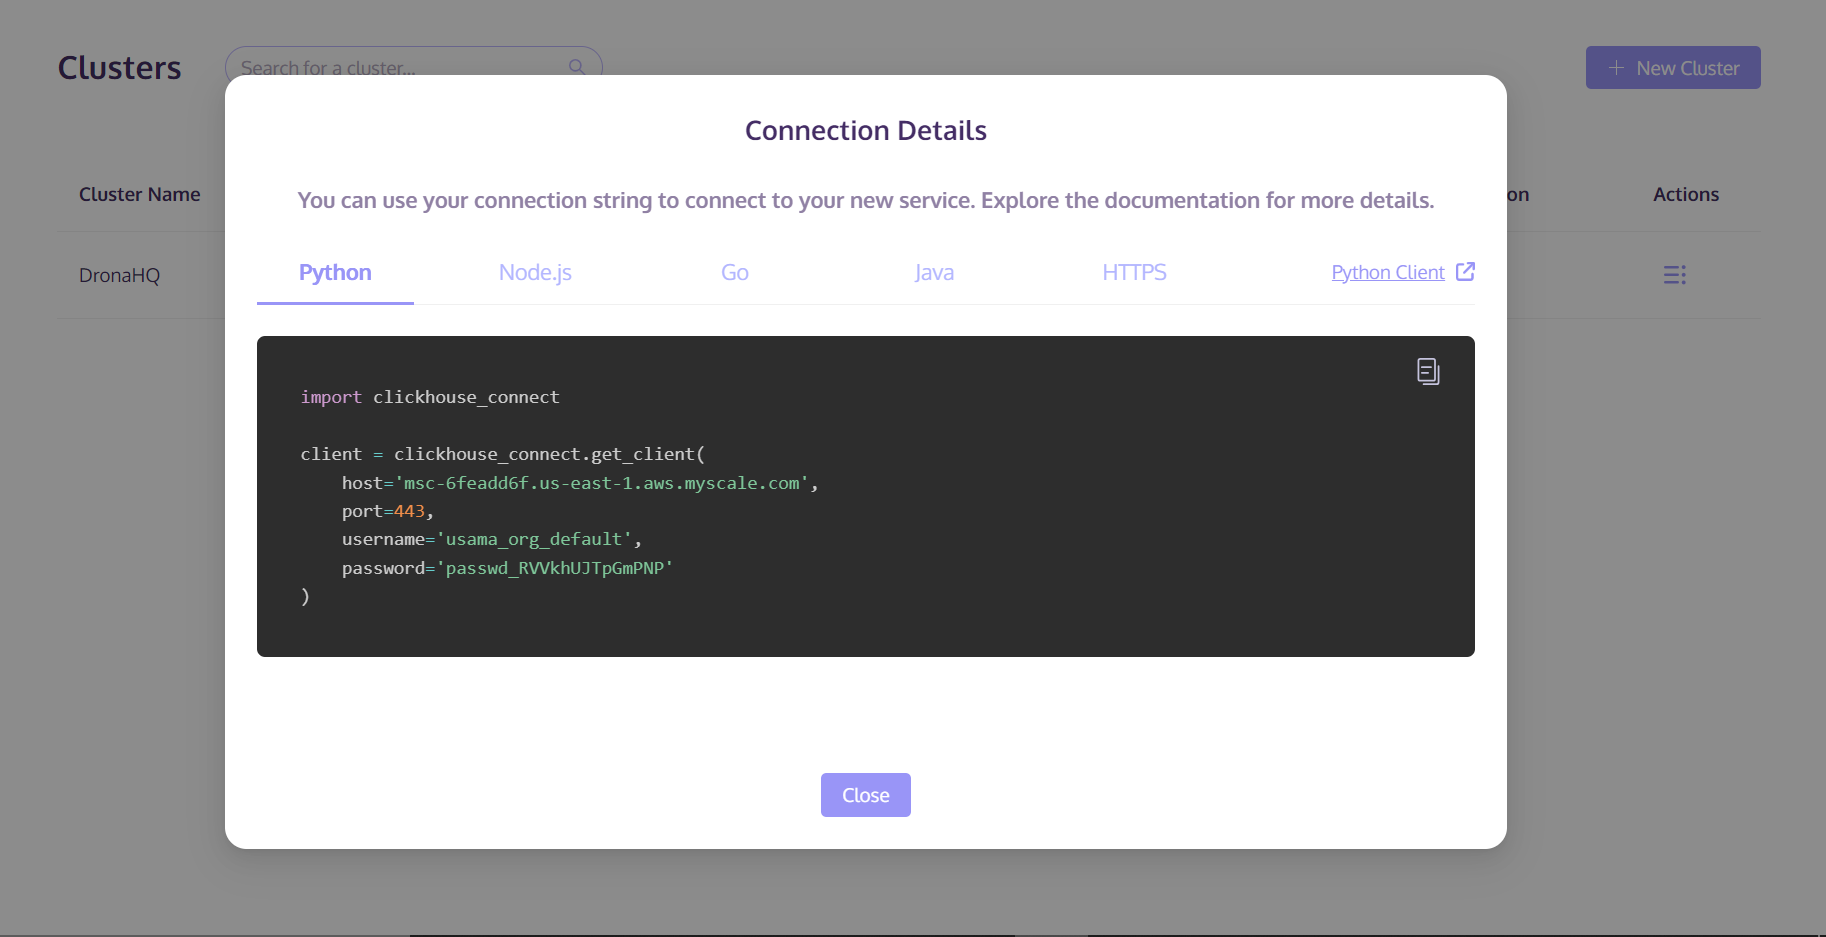
Once the cluster is created, click the “Actions” button on the right side of the cluster. Then select “Connection Details” from the pop-up list. Save the host/port/username/password information from the “Python” tab. This information will be used to access and save the data to the MyScaleDB Cluster.
Now, that we are all set up for the MyScaleDB configurations, the next is to prepare and save the data to this newly created cluster.
Prepare and Save the Data
We are utilizing synthetically generated data, specifically tailored to our requirements, which was created using a large language model (LLM). You can access this dataset through the corresponding GitHub repository.
Install the Dependencies
First, we need to install the necessary libraries. Uncomment the following line and run it to install the required packages. If the libraries are installed on your system, you can skip this step.
BASH CODE:
# pip install sentence-transformers clickhouse_connect
Load the Data
First, you need to load the data you’ve fetched from GitHub into your local directory. Ensure that the paths to your files are correctly specified. Here’s how you can load the data:
import pandas as pd
# Load data from CSV files
df_restaurants = pd.read_csv("restaurants.csv")
df_users = pd.read_csv("users.csv")
df_reviews = pd.read_csv("reviews.csv")
Here, we have three CSV files:
- `restaurants.csv`: Contains details about restaurants such as name, rating, cuisines, average price, and location.
- `reviews.csv`: Includes user reviews, specifying which user gave what rating to which restaurant.
- `users.csv`: Stores user preferences, including preferred cuisines, average rating, and average spending.
Load the Embedding Model
Next, we’ll use an embedding model from `Huggingface` to generate embeddings for our text data. The model we’re using is free and named `sentence-transformers/all-MiniLM-L6-v2`.
“`python
import torch
from transformers import AutoTokenizer, AutoModel
# Initialize the tokenizer and model for embeddings
tokenizer = AutoTokenizer.from_pretrained("sentence-transformers/all-MiniLM-L6-v2")
model = AutoModel.from_pretrained("sentence-transformers/all-MiniLM-L6-v2")
def get_embeddings(texts: list) -> list:
inputs = tokenizer(texts, padding=True, truncation=True, return_tensors="pt", max_length=512)
with torch.no_grad():
outputs = model(**inputs)
embeddings = outputs.last_hidden_state.mean(dim=1)
return embeddings.numpy().tolist()
“`
The `get_embeddings` method will take a list of strings and return their embeddings.
Generate the Embeddings
Now, let’s generate embeddings for specific fields in our data—cuisine type for restaurants, preferred cuisines for users, and reviews for each restaurant. These embeddings will be crucial for performing similarity searches later.
“`python
# Generate embeddings for cuisine types and user preferences
df_restaurants["cuisine_embeddings"] = get_embeddings(df_restaurants["cuisine"].tolist())
df_users["cuisine_preference_embeddings"] = get_embeddings(df_users["cuisine_preference"].tolist())
# Generate embeddings for reviews
df_reviews["review_embeddings"] = get_embeddings(df_reviews["review"].tolist())
“`
Connect with MyScaleDB
To connect with your MyScaleDB cluster, use the connection details you copied during the cluster creation process. This will allow you to establish a connection to your MyScaleDB instance.
“`python
import clickhouse_connect
# Connect to MyScaleDB
client = clickhouse_connect.get_client(
host='your_host_name_here',
port=443,
username='your_username_here',
password='your_password_here'
)
“`
Create Tables
The next step is to create tables within your MyScaleDB cluster where you can store your data. Based on the needs of your application, you’ll create tables for users, restaurants, and reviews.
“`python
# Create the users table
client.command("""
CREATE TABLE default.users (
userId Int64,
cuisine_preference String,
rating_preference Float32,
price_range Int64,
latitude Float32,
longitude Float32,
cuisine_preference_embeddings Array(Float32),
CONSTRAINT check_data_length CHECK length(cuisine_preference_embeddings) = 384
) ENGINE = MergeTree()
ORDER BY userId
""")
# Create the reviews table
client.command("""
CREATE TABLE default.reviews (
userId Int64,
restaurantId Int64,
rating Float32,
review String,
review_embeddings Array(Float32),
CONSTRAINT check_data_length CHECK length(review_embeddings) = 384
) ENGINE = MergeTree()
ORDER BY userId
""")
# Create the restaurants table
client.command("""
CREATE TABLE default.restaurants (
restaurantId Int64,
name String,
cuisine String,
rating Float32,
price_range Int64,
latitude Float32,
longitude Float32,
cuisine_embeddings Array(Float32),
CONSTRAINT check_data_length CHECK length(cuisine_embeddings) = 384
) ENGINE = MergeTree()
ORDER BY restaurantId
""")
“`
Insert Data into Tables
With the tables created, you can now insert the data into these tables using the insert method.
“`python
# Insert data into the users table
client.insert("default.users", df_users.to_records(index=False).tolist(), column_names=df_users.columns.tolist())
# Insert data into the reviews table
client.insert("default.reviews", df_reviews.to_records(index=False).tolist(), column_names=df_reviews.columns.tolist())
# Insert data into the restaurants table
client.insert("default.restaurants", df_restaurants.to_records(index=False).tolist(), column_names=df_restaurants.columns.tolist())
“`
Create the MSTG Index
Finally, to enable efficient searching within your data, create an MSTG index on each of the tables.
“`python
# Create the MSTG index for users
client.command("""
ALTER TABLE default.users
ADD VECTOR INDEX user_index cuisine_preference_embeddings
TYPE MSTG
""")
# Create the MSTG index for restaurants
client.command("""
ALTER TABLE default.restaurants
ADD VECTOR INDEX restaurant_index cuisine_embeddings
TYPE MSTG
""")
# Create the MSTG index for reviews
client.command("""
ALTER TABLE default.reviews
ADD VECTOR INDEX reviews_index review_embeddings
TYPE MSTG
""")
“`
Till now, we have completed the back-end of our application. Now, it’s time to focus on building the front-end using DronaHQ. Let’s see how we can do this.
Building App on DronaHQ
DronaHQ is a low-code app development platform designed for creating custom web and mobile applications 10x faster. With its powerful building blocks—such as pre-built UI components, data connectors, and workflow automation tools—DronaHQ significantly reduces the time and effort needed for development, allowing you to build apps quickly without dealing with complex frontend frameworks.
Whether you’re a full-stack developer, focused on backend or frontend work, or just starting your journey as a developer, DronaHQ makes it easy to drag and drop UI elements, connect to various data sources, and build impressive applications.
Let’s create a working application that performs vector searches on the MyScale database and builds a recommendation interface for restaurants.
Integrating MyScale vector search DB with DronaHQ
To integrate MyScale with DronaHQ, you can leverage the ClickHouse connector, given that MyScaleDB operates on ClickHouse under the hood. Here’s how you can set it up:
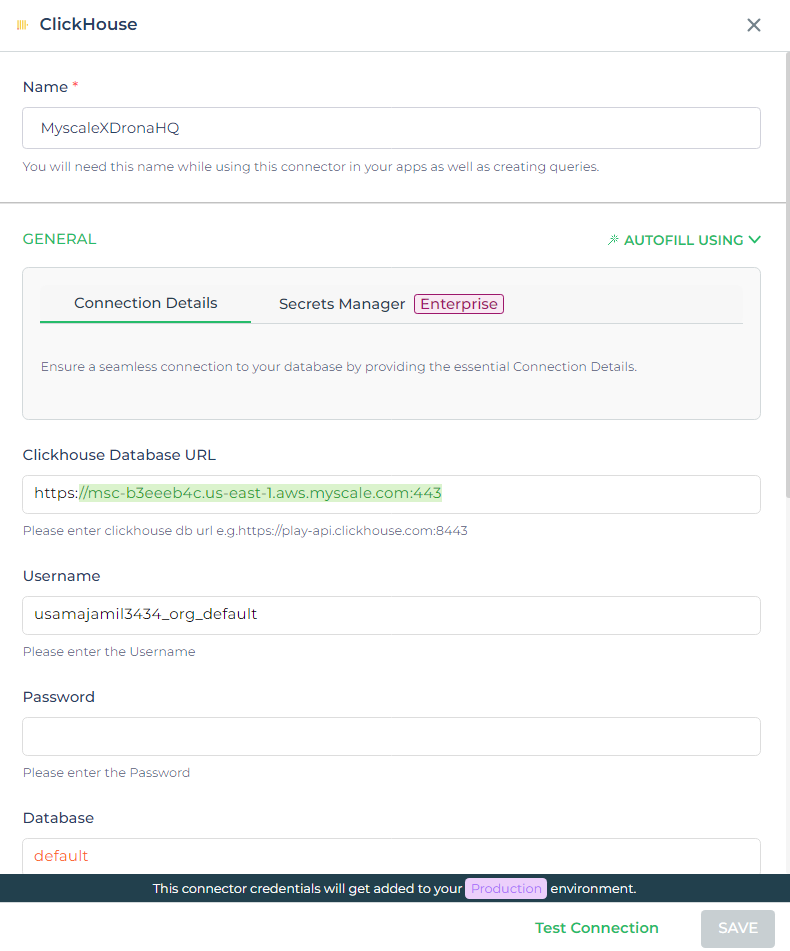
- Choose the ClickHouse Connector: In DronaHQ, navigate to the connectors section and select the ClickHouse connector. This will serve as the interface for connecting to MyScaleDB.

- Enter MyScaleDB Credentials: Fill in the required details for your MyScaleDB instance: – Database URL: The endpoint where your MyScaleDB instance is hosted. – Username and Password: Your authentication credentials.
– Database Name: Set this to `default` unless your setup specifies a different database.
- Test and Save: After entering the credentials, click on “Test” to ensure the connection is established successfully. If the test passes, save the configuration. This will create a connector in DronaHQ that is ready to interact with your MyScaleDB.


By following these steps, you’ll have a fully functional connector in DronaHQ that can communicate with MyScaleDB, enabling you to execute queries, fetch data, and power your applications with advanced database capabilities.
Writing Queries for Restaurant Finder
With the MyScaleDB connector configured in DronaHQ, we can now write queries to fetch restaurant recommendations based on user input. The queries will dynamically adjust according to the user’s cuisine preferences and price range.
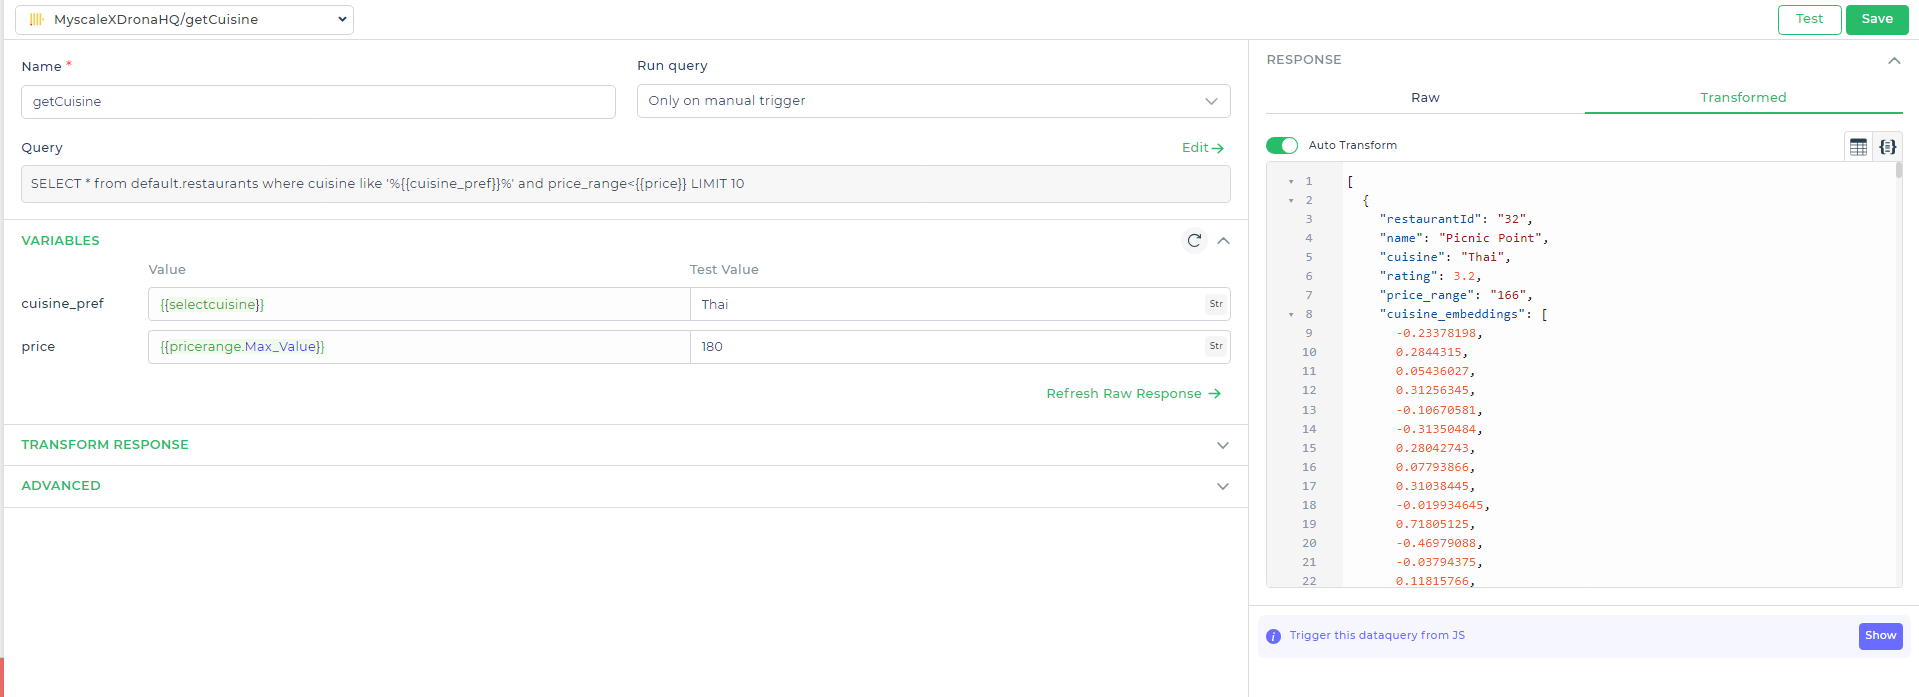
Query 1: Fetching Initial Restaurant Recommendations
First, we need to retrieve a list of restaurants that match the user’s preferred cuisine type and fall within their specified price range. The following query achieves this:
Query:
“`sql
SELECT * FROM default.restaurants
WHERE cuisine LIKE '%{{cuisine_pref}}%'
AND price_range < {{price}}
LIMIT 10;
“`
Explanation:
– `default.restaurants`: Refers to the table in MyScaleDB where the restaurant data is stored.
– `cuisine LIKE ‘%{{cuisine_pref}}%’`: This condition filters the results based on the user’s cuisine preference. The `{{cuisine_pref}}` is a placeholder that DronaHQ dynamically replaces with the actual user input.
– `price_range < {{price}}`: Filters restaurants to those that have a price lower than the user-specified budget, represented by the `{{price}}` placeholder.
– `LIMIT 10`: Restricts the results to the top 10 matching restaurants to ensure the query returns a manageable number of recommendations.
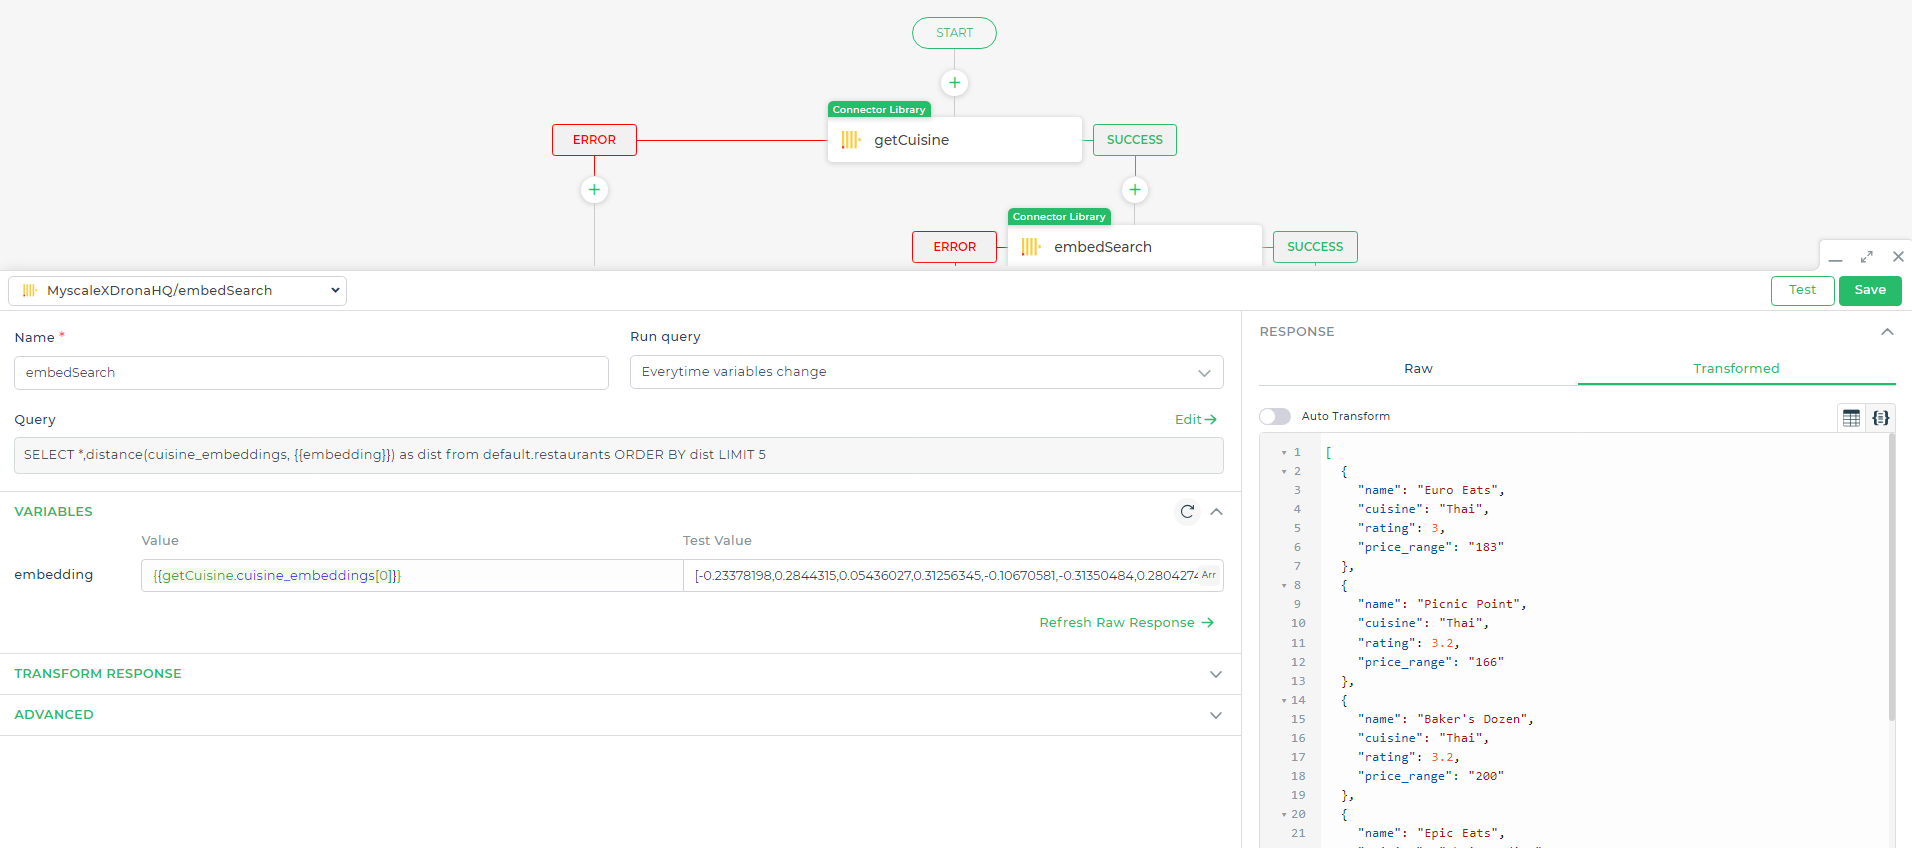
Query 2: Performing a Vector Search for Enhanced Recommendations
After the initial list of restaurants is presented, we want to use vector search to provide additional recommendations based on the characteristics of the initial choices. This allows the application to suggest restaurants that are similar in concept or experience, even if they don’t match exactly on keywords.
Query:
“`sql
SELECT *, distance(cuisine_embeddings, {{embedding}}) AS dist
FROM default.restaurants
ORDER BY dist
LIMIT 5;
“`
Explanation:
– `distance(cuisine_embeddings, {{embedding}}) AS dist`: This expression calculates the distance between the vector embedding of each restaurant’s cuisine and the user’s preferred cuisine embedding. The `{{embedding}}` placeholder represents the user’s cuisine preference transformed into a vector, which is then compared against the `cuisine_embeddings` stored in the database.
– `ORDER BY dist`: The results are ordered by the computed distance, with the closest matches (i.e., those with the smallest distance) appearing first.
– `LIMIT 5`: Restricts the results to the top 5 closest matches, ensuring the recommendations are highly relevant.
This combination of standard SQL filtering and vector search enables the application to provide both precise and contextually relevant restaurant recommendations, enhancing the overall user experience.
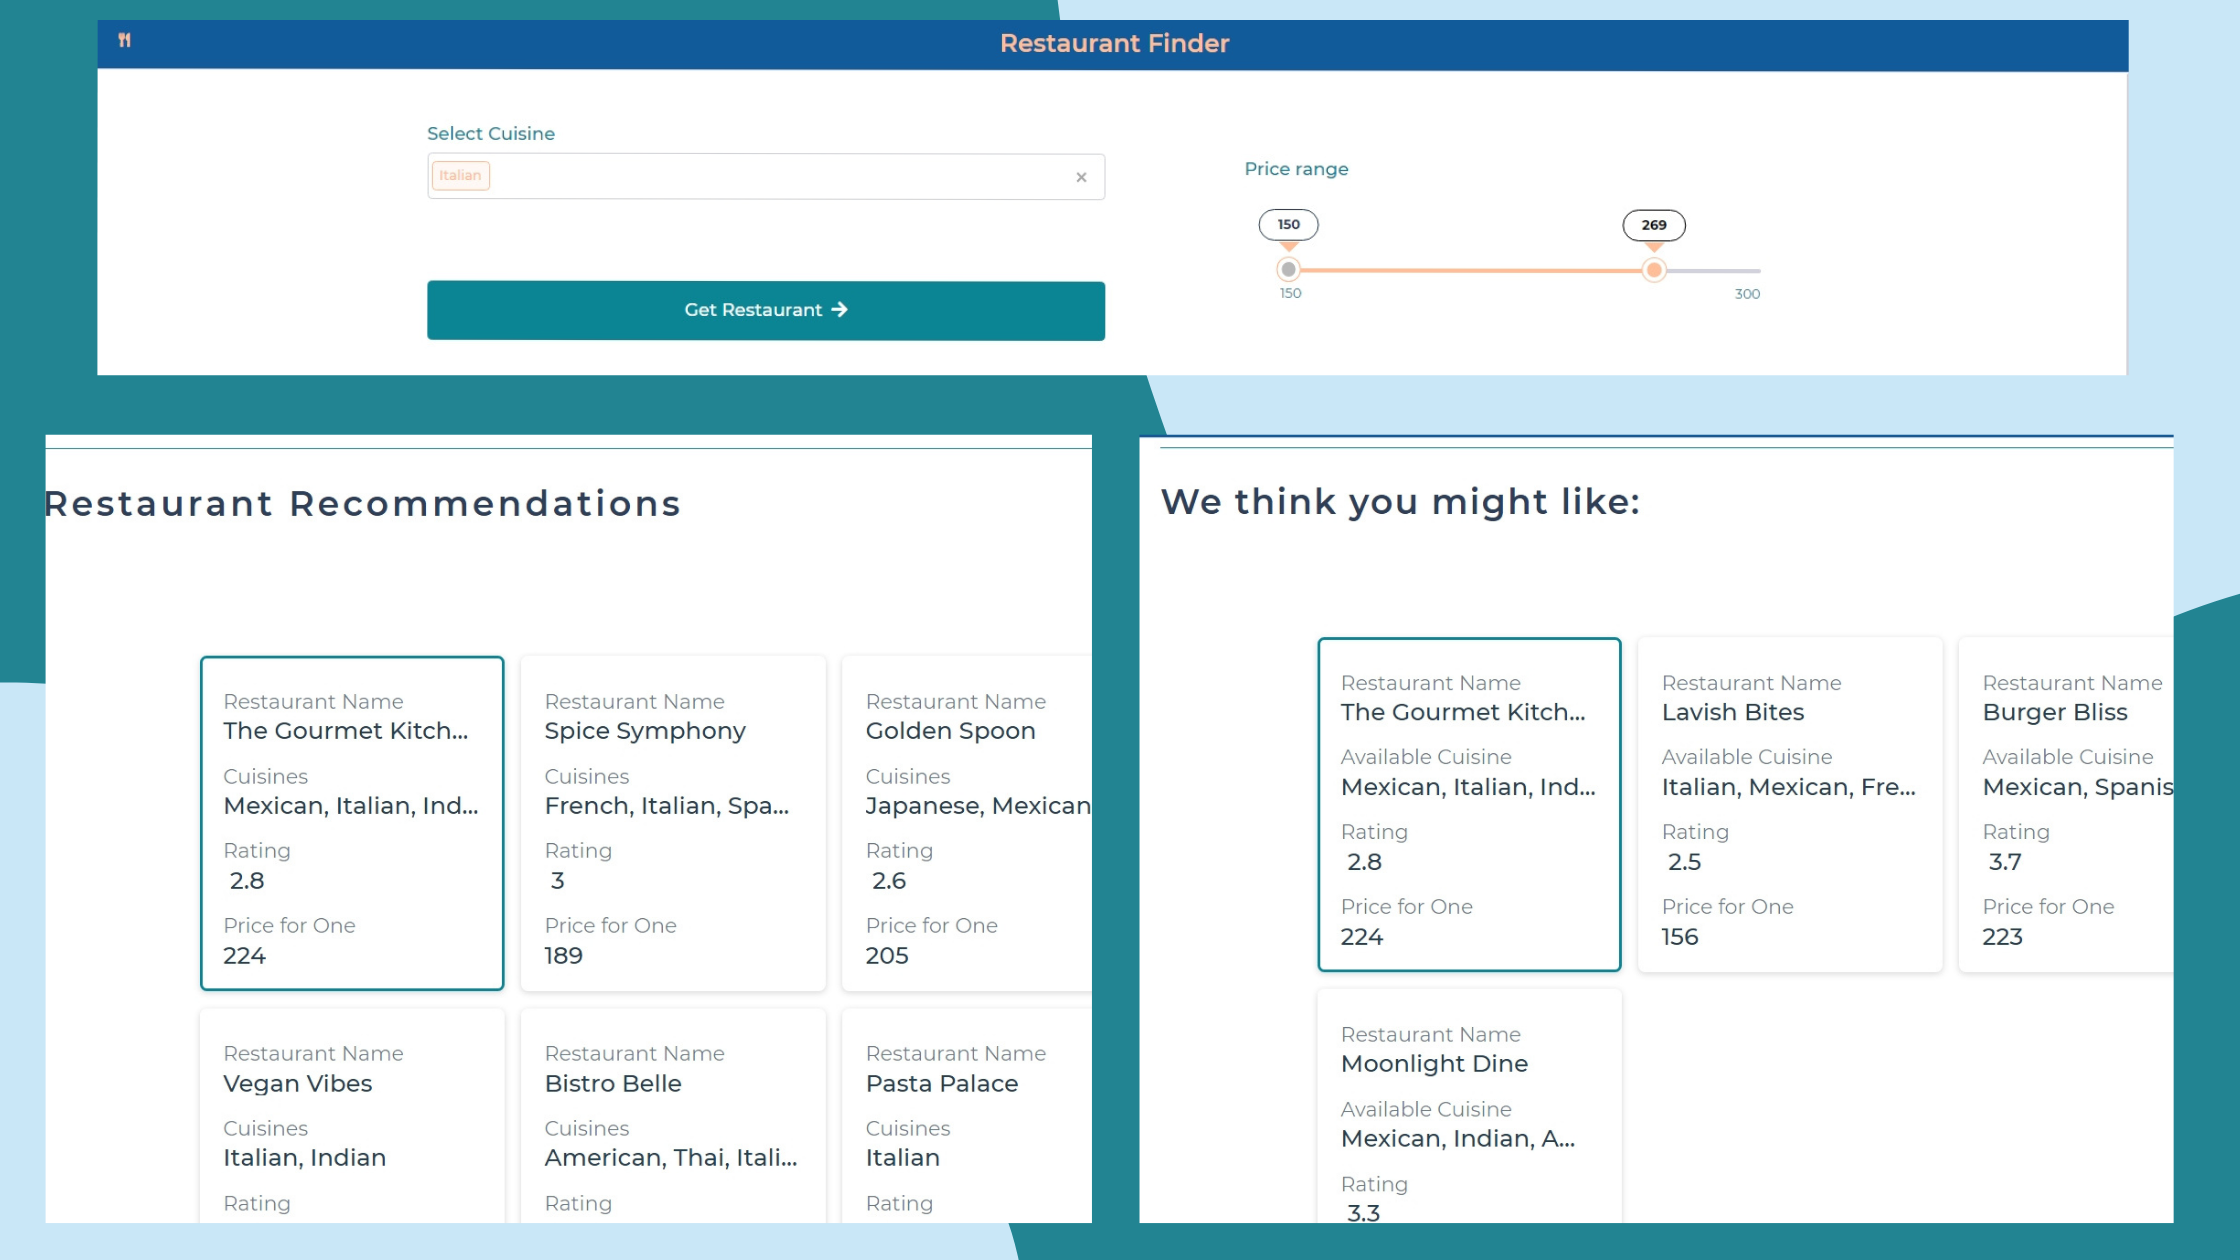
Designing the Interface
When we set out to design the restaurant finder, our primary focus is on creating an interface that is highly functional. DronaHQ’s extensive component library makes it possible to achieve this with minimal coding.
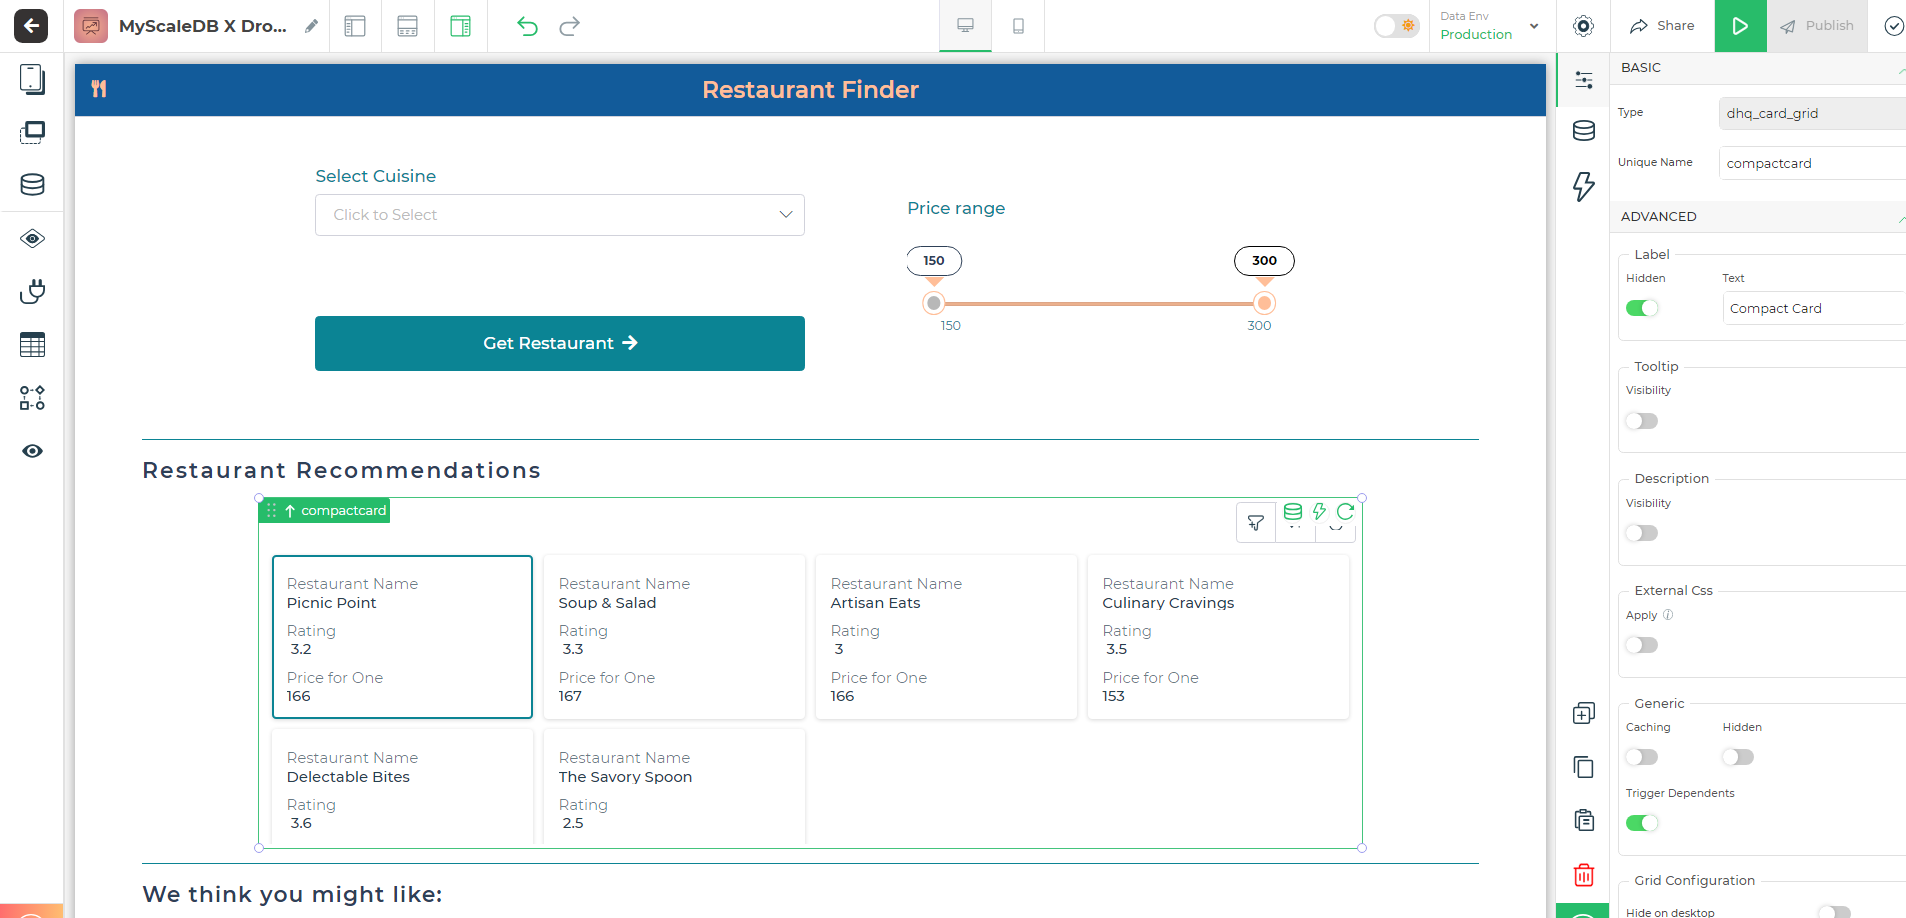
The application starts by allowing users to select their preferred cuisine from a dropdown menu and adjust a price range slider to filter restaurants by budget, with immediate feedback for refining their search. Recommendations are displayed in responsive cards featuring the restaurant’s name, rating, and price per meal, arranged using DronaHQ’s grid layout. To improve the user experience, recommendations are divided into “Restaurant Recommendations” and “We think you might like” sections, providing both targeted and exploratory options.
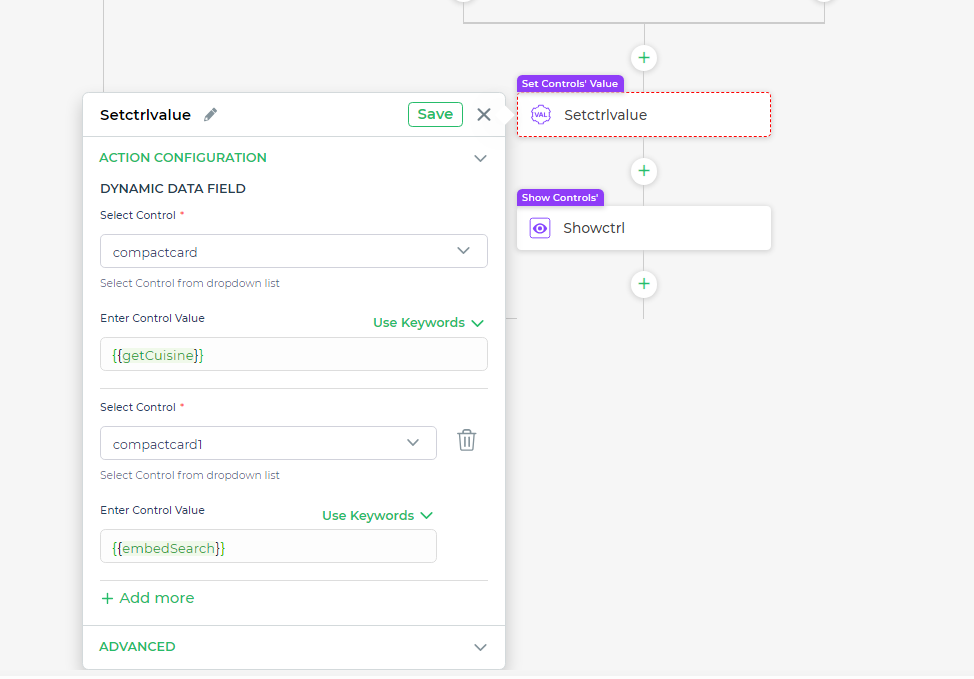
Building an Action Flow to Display Results
With your database queries in place and the UI ready, the last step is to establish an action flow that triggers these queries and displays the results to users in real-time.
Start by navigating to the action flow configuration of the button component within your application. This is where you’ll add the necessary connector actions that will interact with your queries.
Linking the Query to User Input
Select the query designed to fetch restaurant details based on user input. In the variables section, link the input fields, such as cuisine type and price range, to the appropriate components in your UI. This ensures that the query uses the data provided by the user. After linking these, Test the action flow to ensure it works correctly, and then Save the configuration.

Using Embeddings to Find Similar Options
Once the first query successfully retrieves data, set up another connector action that triggers an embedding-based search. This search uses the embedding data from the previous query’s result (specifically the 0th index of the embedding array) to find similar options. This step enhances the relevance of the results displayed to the user.

Displaying the Results in the UI
The final step involves setting the control values. This step ensures that the data retrieved from your queries is properly displayed within the UI components, such as lists or cards, with which users will interact. By setting the control values correctly, you enable a dynamic display that updates according to user input.

Conclusion
By combining the power of MyScaleDB’s vector search with DronaHQ’s low-code environment, we’ve created a sophisticated restaurant finder that delivers highly personalized recommendations. This integration not only allows for precise filtering based on user preferences but also enhances the experience by suggesting similar dining options through advanced embedding techniques.
Beyond restaurant finders, the MyScaleDB and DronaHQ combination can be applied to a variety of other scenarios, like building intelligent chatbots or even observation systems for large language models (LLMs). The flexibility of a vector database, paired with a low-code platform, accelerates development without sacrificing the complexity needed for modern AI applications. This results in faster prototyping, scalability, and the ability to seamlessly integrate advanced features into everyday apps, all while saving development time.